1. Introduction I once heard that Da Vinci said, "Every great painting, starts as a great drawing". I don't know if Da Vinci said that - but it is true. A good drawing is an excellent map to guide a watercolour painting. I have lessons on Grid Drawings, that you can go to for more in-depth teaching on drawing with a grid, but these first couple of lessons are to prep you for an easy watercolour painting. 2. Choosing a subject
I like to paint people because I think they are the easiest to paint. For this lesson, we are going to use a stock photo of a woman in a hat. There a couple of things that I look for when choosing a person for my subject matter. I usually look for dramatic lighting where the emphasis of the dark and light focuses the viewer on the person. Second, I look for simple shapes and lines in the person's face. This will make it easier to draw and paint. I have linked a folder with Headshots for you to use for this assignment. Download the assignment to "My Documents". 3. Getting the Grid on the Original Photo. To do this I use Microsoft Word. I made two templates in Word for photos that are orientated landscape and portrait. I just used a table for the grid and you can download either one here: Landscape Grid TemplatePortrait Grid Template. Its pretty easy to "insert" the picture into grid. Open the Grid Template that suits your photo. Click on the cell A1 and insert a picture.
Once you put the photo into the grid. The grid lines will push over to one side. This is easy to fix by placing the photo "Behind Text". The image should be underneath the grid. I placed this image into the Portrait Grid because I wanted to crop the photo so the woman would fill the page more. You can do this too with Word (you can do all of this in Photoshop too, but its just as easy in Word).
You will need to click on the "Picture Tools - Format" menu at the top of Word and choose to "Crop". The black handles are to crop the photo. I make these match the grid. The white handles are to resize the photo and I will enlarge this to have the woman better fit the grid. The enlarged photo will stay within the cropped size. Once you are done click on Crop again and your photo should fit nicely into the grid. Then, print in colour and you are ready to begin drawing.
1. Introduction As I mentioned before there are more in-depth lessons on Grid Drawing on this website. This lesson is to get a drawing ready for a watercolour painting. A drawing for a watercolour painting must be drawn very lightly and with little to no shading. The graphite in a pencil interacts with watercolour paint and will make the colour look "muddy". 2. Grid
In this particular painting I am using 15"x22" 150lb cold press watercolour paper. I made the grid to be 2" squares. Draw the lines as lightly as possible because you will want to erase them before you start painting. The drawing you can draw a little heavier but you will probably lightly erase the drawing as well. I use an "H" pencil for my drawing. It is light enough for my line work. 3. Outline
What makes the grid a great way to draw is the accuracy you can achieve with it. My first step in using the grid to draw is to draw the outline of my subject. I am looking for the shapes in each cell that will let me know where to draw the outline. Another trick is to make sure that you are looking both at the positive space and the negative space to see what shape to draw in the cell. Sometimes it is easy to see how the positive space (the subject) makes a shape within the cell.
However, sometimes the negative space (background) makes an easier shape to see in the cell. Nevertheless, the first thing I draw is the outline of the subject. 4. Obvious Shapes Next, I usually draw the obvious details that I can see within the photo. These usually include things like the eyes, folds in clothes, where hair meets face, ears, and mouth. It is very important to look at what you are drawing. Many times, I find students not looking at the original photo when drawing. This may seem obvious to look at what you are drawing, but sometimes we get carried away with the line work and need to double check the original to see if what we are drawing is accurate. For example, students will often exaggerate the curve in a line. They will give it an extreme bend, when you look at the original photo the line is considerably straighter. 5. Details
Once I have the obvious shapes drawn in, I will start work on the details. Invariably, the nose will be one of the last things I draw. The reason is that people tend to over draw noses. The only real line work in a nose is the opening of the nostril. Students will often draw a line on the side of the nose, but there is no line there. There is probably a shadow, but it is often near the eye and does not fully run down the side of the nose.
To avoid this, just draw the nostril opening. When it comes time to paint, you may distinguish that side of the nose with a tone of skin colour. When drawing the mouth and chin, I will draw the mouth opening line first. The mouth has a definite shape that is fairly easy to see. Most often the bottom lip will be wider than the top lip. The chin will be likely distinguished be some slight shading under the mouth and at the bottom of the head.
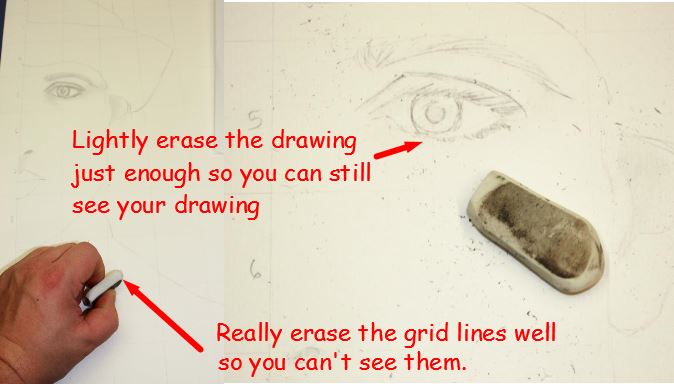
6. Erasing Once you have all you line work done, you will want to erase your grid lines and lightly erase your drawing as well. Why erase the drawing too?
There are two reasons. First, the pencil drawing only serves as a map to your painting. Really, this art work will be about the painting so you might not want the pencil lines showing through. Second, when erasing the grid lines you will be changing the texture of the paper in those areas. If you don't erase all over the page, the paint may adhere differently to places you erased and didn't erase. Once you are done erasing, you are ready to begin painting.